This example covers the creation of a notes simple application to write down some notes and show them in a beautiful way.
To start a new application go to Page "My Applications" and choose Add Application:

The new application is created (Group Main):

Click on the button to proceed.
An application may contain
Scripts can
As good practice we suggest separating the "concerns" of the scripts:
In this example we create:
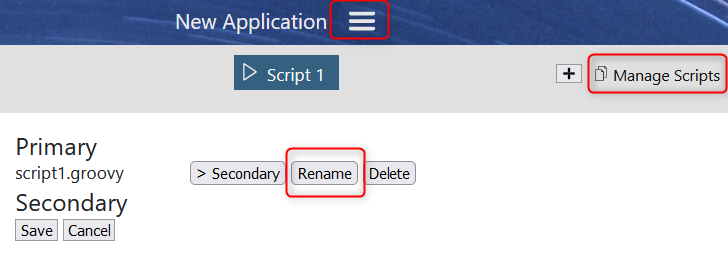
show.groovyadd.groovyNew applications automatically contain one script (script1.groovy), click the symbol for Extended Options button and then Manage Scripts, and change the name to show.groovy.
The lines from top of the script can contain comments to configure title, includes and input fields. In this script the title is "Script 1".
// title: Script 1

System.out.println("Hello User!");
Creating classes in scripts helps if classes grow, but it is optional.
We start a class Main that adds a definition (data types) and reads the records from the storage.
// title: Notes

new Main();

class Main {
    private List<Record> notes;
    private RecordDef recordDef;

    public Main() {
        // Create type for the list of notes
		recordDef = RecordDef
		             .create("note") // Name of the specification
					 .add("group")
					 .add("title")
					 .add("description")
					 .set("tag"); // equal to add()

		// Also
		// .addLong("amount")
		// .addBoolean("confirmed")
		// .addDouble("price")
		// .addDate("created")

        // Read
        notes = STORAGE.get("notes_main", recordDef);

        // Example output (empty now)
        System.out.println("Notes: " + notes);
    }
}
We want to add another script to add notes. The script can be called directly or from the show.groovy.
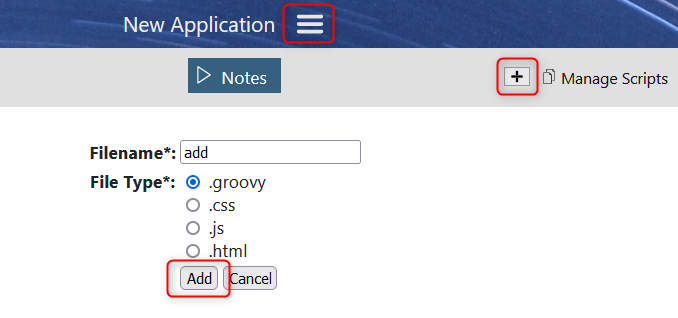
Add another script with + button and name it add.groovy.
// title: Add Note
// input type=line; label=Group size=1
// input type=line; label=Title mandatory
// input type=text; label=Description
// input type=select; label=Tag item=red item=blue item=green

new Main();

class Main {
    private List<Record> notes;
    private RecordDef recordDef;

    public Main() {
        recordDef = RecordDef
		             .create("note")
					 .add("group")
					 .add("title")
					 .add("description")
					 .set("tag");

        // Read
        notes = STORAGE.get("notes", recordDef);

        // Add
        performAdd();

        // Write notes changed
        STORAGE.set("notes", notes, recordDef);
    }

    private void performAdd() {
        String group = INPUT.get(0);
        String title = INPUT.get(1);
        String description = INPUT.get(2);
        String tag = INPUT.get(3);

        Record record = new Record();
        record.set("group", group);
        record.set("title", title);
        record.set("description", description);
        record.set("tag", tag);

        notes.add(record);
    }
}
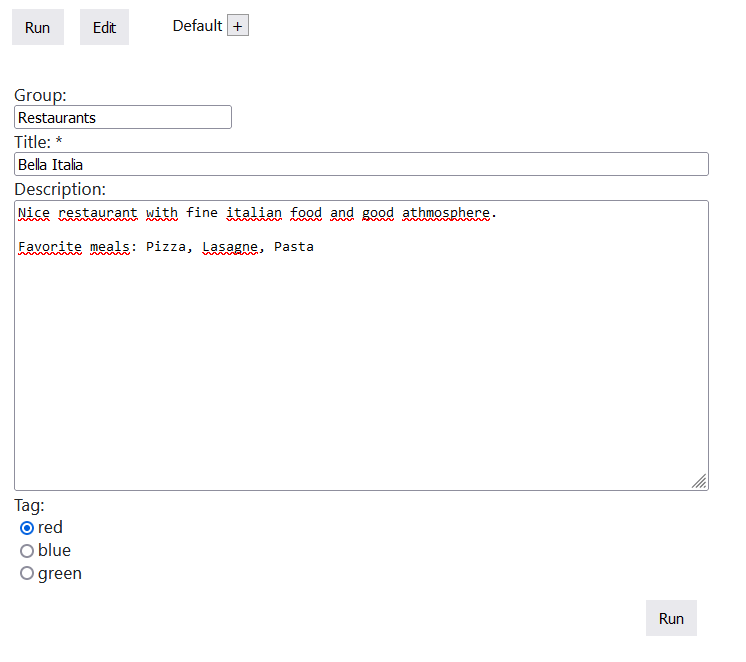
The lines at the top define title and the input fields.
Remarks on the field definition:
mandatory if input is needed// title: Add Note
// input type=line; label=Group size=1
// input type=line; label=Title mandatory
// input type=text; label=Description
// input type=select; label=Tag item=red item=blue item=green
This will create the form:
The easiest way to display content is by writing HTML (can contain CSS and JS).
There is a helpful class HTML integrated that makes it easier to add HTML.
Just write HTML.add() to add output to the page:
HTML.add("<p>Some Paragraph");
To improve the UI some CSS is added by HTML.css().
// title: Notes

import java.util.stream.Collectors;

new Main();

class Main {
    private List<Record> notes;
    private RecordDef recordDef;

    public Main() {
        recordDef = RecordDef
		             .create("note")
					 .add("group")
					 .add("title")
					 .add("description")
					 .set("tag");

        // Read
        notes = STORAGE.get("notes", recordDef);

        // Show the notes
        prepareHtml();
        listNotes();
    }

    private void listNotes() {
        // Create list of groups
        List<String> groupNames = notes.stream()
                .map(note -> note.get("group"))
                .distinct()
                .collect(Collectors.toList());

        // Grouped output
        for (String groupName : groupNames) {
            List<Record> recordsOfGroup = notes.stream().filter(note -> groupName.equals(note.get("group"))).collect(Collectors.toList());

            HTML.add("<h2>" + groupName + "</h2>");

            for (Record note : recordsOfGroup) {
                String title = note.get("title");
                String description = note.get("description");

                // Tags
                String tagsStr = note.get("tag");

                HTML.add("<div class='note" + (tagsStr != null ? " tag tag_" + tagsStr : "") + "'>");
                HTML.add("<span class='note_title'>"+ title +"</span>");
                if (description != null && !"null".equals(description)) {
                    HTML.add("<span class='note_desc'>"+ description +"</span>");
                }
                HTML.add("</div>");
            }
        }
    }

    private void prepareHtml() {
        StringBuilder css = new StringBuilder();
        css.append(".note { border: 2px solid #bbb; padding: 0.5em 1em; margin-top: 0.3em; width: 50%; }");
        css.append(".note_title { display: table-cell; font-size: 1.5em; font-weight: 500; width: 90%; }");
        css.append(".note_desc { display: table-cell; text-align: right; }");

        css.append(".tag .note_title::before { content: ' '; display: inline-block; height: 28px; margin-right: 5px; width: 8px; }");

        css.append(".tag_red .note_title::before {  background-color: #a66; }");
        css.append(".tag_green .note_title::before { background-color: #6a6; }");
        css.append(".tag_blue .note_title::before { background-color: #66a; }");

        HTML.css(css.toString());
    }
}
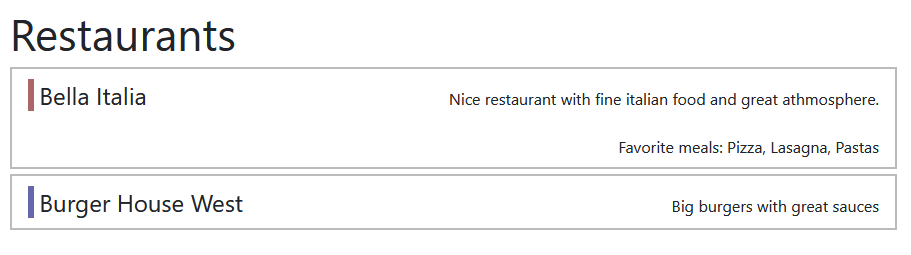
This improved script shows the list of restaurants grouped and with optional tag (red, blue, green):
To manage existing data outside of scripts:
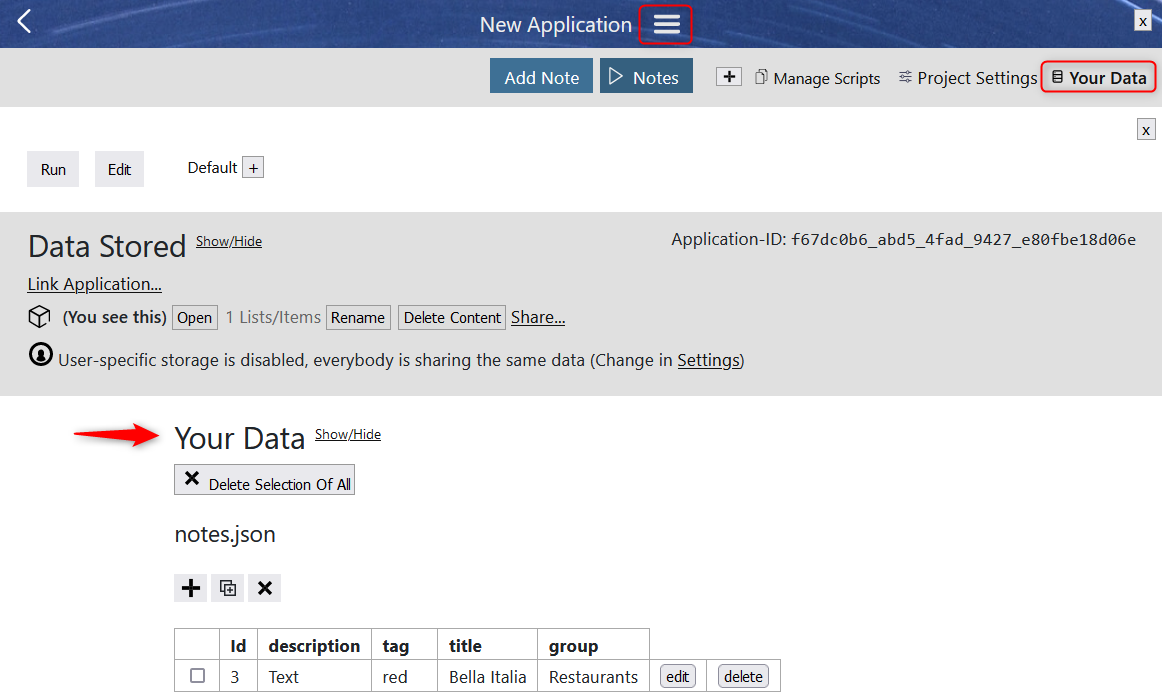
It provides an editor for manipulation of existing data and to add or remove content/datasets.
This was a short overview on how to create a simple application.
More features and more comfort could be added to the example.
More documentation:
Built-in Scripts (Includes):